Automate build and deployment for Flutter Apps
Have you ever thought to automate of building and publishing your Flutter app in one click. If you have ever thought of building it, then you should start here.
What is Continuous integration?
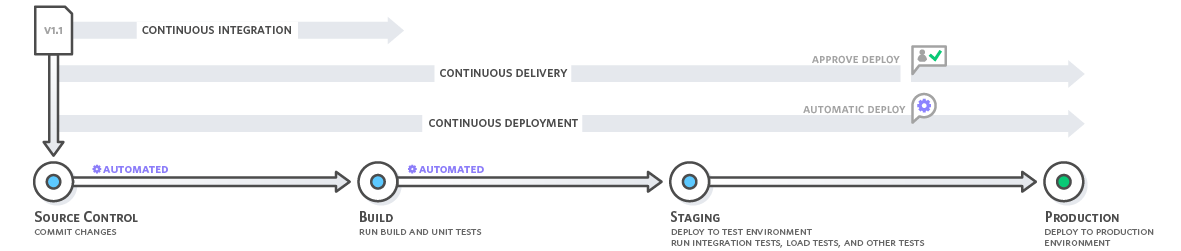
Continuous integration is a DevOps software development practice where developers regularly merge their code changes into a central repository, after which automated builds and tests are run. Continuous integration most often refers to the build or integration stage of the software release process and entails both an automation component (e.g. a CI or build service) and a cultural component (e.g. learning to integrate frequently).
Source : AWS
With continuous delivery, code changes are automatically built, tested, and prepared for a release to production. Continuous delivery expands upon continuous integration by deploying all code changes to a testing environment and/or a production environment after the build stage.
There are different methods to implement CI/CD for a Flutter project.
Fastlane + Firebase
Note: If you need to build an iOS App you definitely need a Mac!
To install fastlane using RubyGems, just run this command from the terminal:
sudo gem install fastlane -NVAlternatively, you can also use this command to install it using Homebrew:
brew install fastlane1. Set up fastlane
Navigate to the Android directory (MyProject/android/) of your Flutter project, and initialize fastlane using the following command:
fastlane initSet up your package name Eg: com.smazee.workrelax (make sure the package name is same as mentioned in AndroidManifest.xml). You can add secret JSON file path later.
This will generate a fastlane folder inside the android directory containing two files:
a. Appfile (which contains the package name and secret JSON file path) b. Fastfile (which contains the commands for building and uploading the app)
do the same in ios directory(MyProject/ios/) to set up fastlane for iOS. You need to set up app identifier and apple id similarly.
2. Add the Firebase
If you don't have firebase-cli already installed run the below command in terminal
curl -sL [https://firebase.tools](https://firebase.tools/) | bashIf you already installed the login into your Firebase account. This command will open a webpage from where you can log in to Firebase using your Google account.
firebase loginCreate a new Firebase project for your app. Then go to Settings –> Project settings → Android(icon on bottom of page) .Enter the Android package name, App nickname and SHA-1, then click on Register app. To generate SHA-1, you have to run the following command from the root Flutter app directory:
 bash
 keytool -list -v \
 -alias androiddebugkey -keystore ~/.android/debug.keystore
Download the google-services.json file and place it in the desired folder, then click on Next.
You will find the App ID for the Android app in this page. We will need this App ID in the future for configuring fastlane. Similarly do the same for your ios app.
To add the Firebase App Distribution plugin for fastlane, run the following command from the android directory:
fastlane add_plugin firebase_app_distributionNow, you can use this plugin inside your Fastfile to upload your app to Firebase App Distribution.
3. Setting up Fastlane
To customize android app navigate to MyProject → android → fastlane → Fastfile
Note: The Fastfile is written using Ruby language.
Here, you will see that there are three lanes specified:
- test
- beta
- deploy
Now we re-write the default Fast
platform :android do
    desc "<Enter a description>"
    gradle(
        task: 'assemble',
        build_type: 'Release'
    )
    lane :android_beta_app do
        firebase_app_distribution(
            app: "<Enter the App ID from Firebase>",
            testers: "***@gmail.com, ***@gmail.com",
            release_notes: "<Enter the release notes>",
            firebase_cli_path: "/usr/local/bin/firebase",
            apk_path: "../build/app/outputs/apk/release/app-release.apk"
        )
    end
end*Replace the angle brackets with proper information.
To customize ios app navigate to MyProject → ios → fastlane → Fastfile and add the following and finish the setup
platform :ios do
  desc "<Enter a description>"
    lane :ios_beta_app do
        build_app(
            scheme: "Runner",
            archive_path: "./build/Runner.xcarchive",
            export_method: "development",
            output_directory: "./build/Runner"
        )
        firebase_app_distribution(
            app: "<Enter the App ID from Firebase>",
            testers: "***@gmail.com, ***@gmail.com",
            release_notes: "Initial test version of the app",
            firebase_cli_path: "/usr/local/bin/firebase",
            ipa_path: "./build/Runner/Runner.ipa"
        )
    end
end*Replace the angle brackets with proper information.
Lets go through the code that we had written
lane: At the beginning we have to define the lane name, here it is android_beta_app and then we have to define the firebase_app_distribution settings
- app: Enter the unique App ID generated by Firebase
- testers: Enter the email of the people to whom you want to send the test version of the app
- release_notes: Here you can add some notes which will be displayed while the testers download the app on their device
- firebase_cli_path: Path to the Firebase CLI tool
- apk_path: Path to the generated .apk file
Deploying to Firebase App Distribution
The project is now ready to be deployed to Firebase App Distribution using the fastlane configuration we have defined.
To deploy the Android .apk file to Firebase App Distribution, follow the steps below:
- Go to your project from the Firebase console.
- Then, from the options on the left of the page, select App Distribution.
- Then click on Get started.
- Now, you can run the script from terminal to publish the app to Firebase App Distribution. Run this command from the
androidfolder:
bundle exec fastlane **android_beta_app**If the lane gets successfully deployed, you will get a success message as firelane.tools finished successfully 🎉
You can now go to the App Distribution option of the project from Firebase console to find the deployed version of the app. Similarly you can do the same for building ios.
Using Codemagic
Codemagic provides you easy and one click build and easy to publish on play store. It provides build for all platforms.
- Create a Codemagic Account
- Connect to GitHub / GitLab (where your repository located )
- Click Start new build on your flutter repo to run a build for Android and iOS on debug mode.
- Download your build after build process completed.
- You can code sign, trigger build, add env variables, test and publish your apps on settings.
Codemagic gives you a clean GUI to config and to setup your build which makes the process simple and easy.
Using GitHub Actions
Github Actions are similar to GitLab CI/CD
- Build a Flutter project and host on a GitHub repo
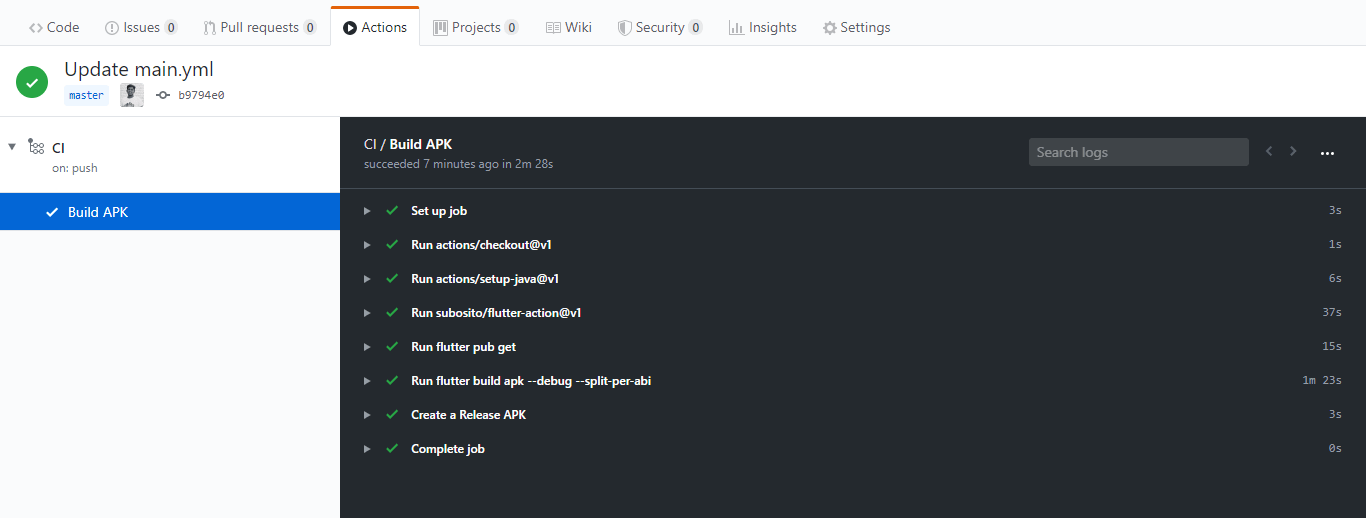
- Go to your GitHub project repo and navigate to Actions tab.
- GitHub Actions automatically suggest you with default dart test code based on your project repo. But as we need to run flutter click on Skip this and set up a workflow yourself.
- Add the code
name: CI

# Controls when the action will run. Triggers the workflow on push or pull request
# events but only for the master branch
on:
  push:
    branches: [ master ]
  pull_request:
    branches: [ master ]
jobs:
  build:
    name: Build APK
    runs-on: ubuntu-latest

    steps:
    - uses: actions/checkout@v1
    - uses: actions/setup-java@v1
      with:
        java-version: '12.x'
    - uses: subosito/flutter-action@v1
      with:
        flutter-version: '1.7.8+hotfix.4'
    - run: flutter pub get
    - run: flutter test
    - run: flutter build apk --split-per-abi
    - name: Create a Release APK
      uses: ncipollo/release-action@v1
      with:
                tag: "latest"
        artifacts: "build/app/outputs/apk/debug/*.apk"
        token: ${{ secrets.TOKEN_NAME }}
We had set the trigger to run action when we push the code on master branch. In line 8 we will pull the source code from our repository and, for this, we will use a GitHub Action called checkout. In next step we set up a Java environment using setup-java. Then we use flutter-action to setup Flutter env and we can use flutter commands. If you don't have a test code remove flutter test command
At last we need to setup GitHub Token for the project.
- Go to the personal access tokens section in your GitHub settings.
- Generate a new token which has scope for repository access and copy its value.
- Then navigate repository settings for your project at
<your repo url>/settings/secrets. In the Secrets tab, add a new secret with the same token name from your workflow file (TOKEN_NAMEin this project) and paste the token value.
Now whenever you push your code GitHub Actions will create a apk file for you. You can go to Actions tab on your repo to see the build status.
You can go to <your repo url>/release to view the build APK and source code files
In this I had set version (tag) to latest by default. You can set tag before you commit.
git tag v2.0.0
git push origin v2.0.0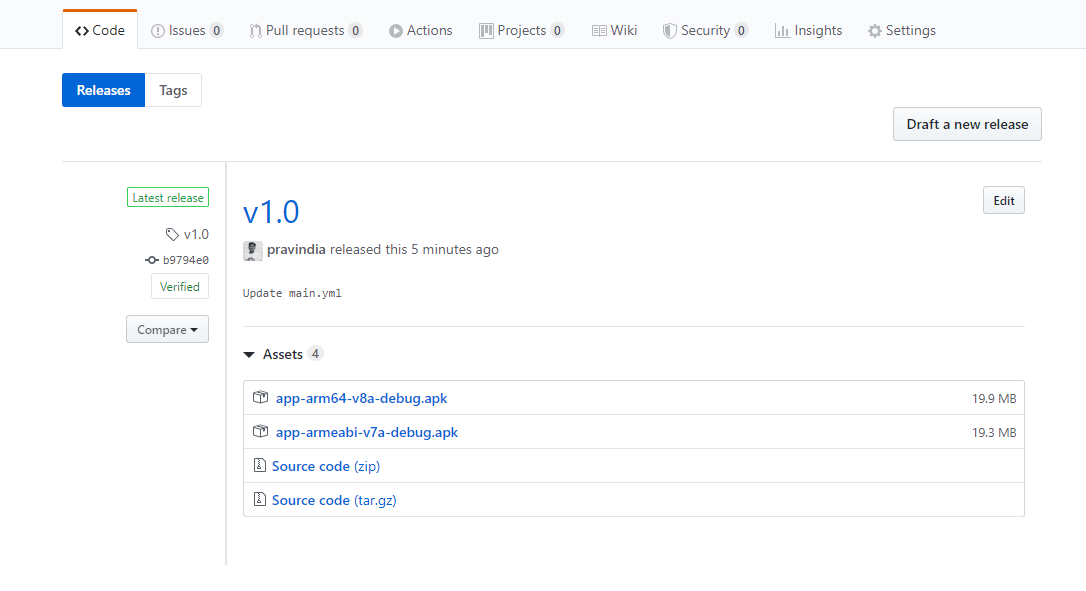
To know more visit Workflow syntax for GitHub Actions.
Flutter App can build, test and deployment is now became much easier with CI/CD. At Smazee, for Flutter Application Development we use GitHub Actions tool to automate our build process.
Quit testing your code on production. Test your code and then deploy to production

Try it out and have a Happy Friday with Flutter 💙!