Biometric Authentication inside Flutter App
In this article, we will look into biometric authentication and how it is achieved in flutter.
Biometric Authentication:
Biometric authentication is a security process that relies on the unique biological characteristics of an individual to verify that he is who he says he is. Biometric authentication systems compare a captured biometric data to a stored and confirmed authentic data in a database.
Process:
For Android:
-
Include local_auth package in pubspec.yml file
-
To get fingerprint permission open the android\app\src\main\AndroidManifest.xml file from and include the following code inside
<manifest>tag :<uses-permission android:name="android.permission.USE_FINGERPRINT"/> -
Open the MainActivity.kt file and include the following code:
import androidx.annotation.NonNull;
import io.flutter.embedding.android.FlutterFragmentActivity
import io.flutter.embedding.engine.FlutterEngine
import io.flutter.plugins.GeneratedPluginRegistrant

class MainActivity: FlutterFragmentActivity() {
    override fun configureFlutterEngine(@NonNull flutterEngine: FlutterEngine) {
        GeneratedPluginRegistrant.registerWith(flutterEngine);
    }
}
and remove FlutterActivity class.
// To be removed
class MainActivity: FlutterActivity() {
}
For iOS:
Note that this plugin works with both TouchID and FaceID. However, to use the latter, you also need to add:
<key>NSFaceIDUsageDescription</key>
<string>Why is my app authenticating using face id?</string>
to your Info.plist file. Failure to do so results in a dialog that tells the user your app has not been updated to use TouchID.
About local_auth:
To check whether there is local authentication available on this device or not, call canCheckBiometrics:
bool canCheckBiometrics = await localAuth.canCheckBiometrics;Currently, the following biometric types are implemented:
- BiometricType.face
- BiometricType.fingerprint
To get a list of enrolled biometrics, call getAvailableBiometrics:
List<BiometricType> availableBiometrics = await auth.getAvailableBiometrics();

if (Platform.isIOS) {
    if (availableBiometrics.contains(BiometricType.face)) {
        // Face ID.
    } else if (availableBiometrics.contains(BiometricType.fingerprint)) {
        // Touch ID.
    }
}
We have default dialogs with an ‘OK’ button to show authentication error messages for the following 2 cases:
- Passcode/PIN/Pattern Not Set. The user has not yet configured a passcode on iOS or PIN/pattern on Android.
- Touch ID/Fingerprint Not Enrolled. The user has not enrolled any fingerprints on the device.
Which means, if there’s no fingerprint on the user’s device, a dialog with instructions will pop up to let the user set up fingerprint. If the user clicks ‘OK’ button, it will return ‘false’.
Use the exported APIs to trigger local authentication with default dialogs:
var localAuth = LocalAuthentication();
bool didAuthenticate =
    await localAuth.authenticateWithBiometrics(
        localizedReason: 'Please authenticate to show account balance');
If you don’t want to use the default dialogs, call this API with ‘useErrorDialogs = false’. In this case, it will throw the error message back and you need to handle them in your dart code:
bool didAuthenticate =
    await localAuth.authenticateWithBiometrics(
        localizedReason: 'Please authenticate to show account balance',
        useErrorDialogs: false);
You can use our default dialog messages, or you can use your own messages by passing in IOSAuthMessages and AndroidAuthMessages:
import 'package:local_auth/auth_strings.dart';

const iosStrings = const IOSAuthMessages(
    cancelButton: 'cancel',
    goToSettingsButton: 'settings',
    goToSettingsDescription: 'Please set up your Touch ID.',
    lockOut: 'Please reenable your Touch ID');
await localAuth.authenticateWithBiometrics(
    localizedReason: 'Please authenticate to show account balance',
    useErrorDialogs: **false**,
    iOSAuthStrings: iosStrings);
If needed, you can manually stop authentication for android:
void _cancelAuthentication() {
    localAuth.stopAuthentication();
}
Exceptions
There are 6 types of exceptions: PasscodeNotSet, NotEnrolled, NotAvailable, OtherOperatingSystem, LockedOut and PermanentlyLockedOut. They are wrapped in LocalAuthenticationError class.
You can catch the exception and handle them by different types. For example:
import 'package:flutter/services.dart';
import 'package:local_auth/error_codes.dart' as auth_error;

try {
  bool didAuthenticate = await local_auth.authenticateWithBiometrics(
      localizedReason: 'Please authenticate to show account balance');
} on PlatformException catch (e) {
  if (e.code == auth_error.notAvailable) {
    // Handle this exception here.
  }
}
Example:
Create a new project and paste the following code in main.dart
import 'package:flutter/material.dart';
import 'package:local_auth/local_auth.dart';
void main() {
runApp(MyApp());
}
class MyApp extends StatefulWidget {
@override
_MyAppState createState() => _MyAppState();
}
class _MyAppState extends State<MyApp> {
bool isAuth = false;
void checkBiometric() async {
final LocalAuthentication auth = LocalAuthentication();
bool canCheckBiometrics = false;
try {
canCheckBiometrics = await auth.canCheckBiometrics;
} catch (e) {
print("error biome trics $e");
}
print("biometric is available: $canCheckBiometrics");
List<BiometricType> availableBiometrics;
try {
availableBiometrics = await auth.getAvailableBiometrics();
} catch (e) {
print("error enumerate biometrics $e");
}
print("following biometrics are available");
if (availableBiometrics.isNotEmpty) {
availableBiometrics.forEach((ab) {
print("\ttech: $ab");
});
} else {
print("no biometrics are available");
}
bool authenticated = false;
try {
authenticated = await auth.authenticateWithBiometrics(
localizedReason: 'Touch your finger on the sensor to login',
useErrorDialogs: true,
stickyAuth: false
// androidAuthStrings:AndroidAuthMessages(signInTitle: "Login to HomePage")
);
} catch (e) {
print("error using biometric auth: $e");
}
setState(() {
isAuth = authenticated ? true : false;
});
print("authenticated: $authenticated");
}
@override
Widget build(BuildContext context) {
return new MaterialApp(
debugShowCheckedModeBanner: false,
home: new Scaffold(
appBar: new AppBar(
title: new Text('BioAuthentication'),
),
body: new Column(
crossAxisAlignment: CrossAxisAlignment.center,
children: <Widget>[
Expanded(
child: Container(),
),
new RaisedButton(
splashColor: Colors.pinkAccent,
color: Colors.black,
child: new Text(
"Authentiate",
style: new TextStyle(fontSize: 20.0, color: Colors.white),
),
onPressed: checkBiometric,
),
new Expanded(
child: Container(),
),
isAuth == true
? Text(
"Authenticated",
softWrap: true,
style: new TextStyle(fontSize: 30.0, color: Colors.black),
)
: Text(
"Not Authenticated",
softWrap: true,
style: new TextStyle(fontSize: 30.0, color: Colors.black),
),
new Expanded(
child: Container(),
),
],
),
));
}
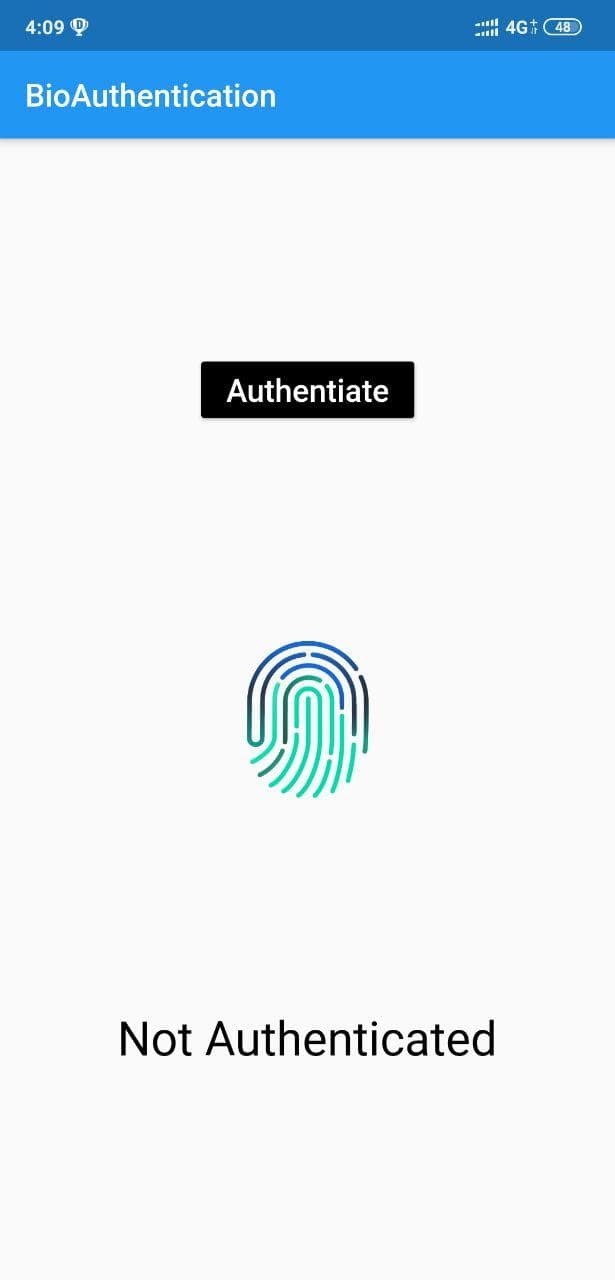
}Sample output:

Code explanation:
Include the necessary package
import 'package:flutter/material.dart';
import 'package:local_auth/local_auth.dart';
Create a stateful widget and include it with run-app.
void main() {
    runApp(MyApp());
}

class MyApp extends StatefulWidget {
    @override
    _MyAppState createState() => _MyAppState();
}

class _MyAppState extends State<MyApp> {
    //code
}
Create Raisebutton inside the scaffold to trigger bio-auth and text to check whether it is authenticated or not.
Widget build(BuildContext context) {
    return new MaterialApp(
    debugShowCheckedModeBanner: false,
    home: new Scaffold(
    appBar: new AppBar(
    title: new Text('BioAuthentication'),
),

body: new Column(
    crossAxisAlignment: CrossAxisAlignment.center,
    children: <Widget>[
        Expanded(
            child: Container(),
        ),

        new RaisedButton(
            splashColor: Colors.pinkAccent,
            color: Colors.black,
            child: new Text(
            "Authentiate",
            style: new TextStyle(fontSize: 20.0, color: Colors.white),
            ),

            onPressed: checkBiometric,
        ),

        new Expanded(
            child: Container(),
        ),

        isAuth == true ?
            Text("Authenticated",softWrap: true,style: new TextStyle(fontSize: 30.0, color: Colors.black),)
            : Text("Not Authenticated",softWrap: true,style: new TextStyle(fontSize: 30.0, color: Colors.black),),

        new Expanded(
            child: Container(),
        ),
    ],
),
));

}
Write onpress function for that raise button which triggers the authentication.
void checkBiometric() async {
    final LocalAuthentication auth = LocalAuthentication();
    //remaining code
}
Call pre-define function to check whether any bio-authenticator is there is a target device
bool canCheckBiometrics = false;
try {
    canCheckBiometrics = await auth.canCheckBiometrics;
} catch (e) {
    print("error biome trics $e");
}

print("biometric is available: $canCheckBiometrics");

List<BiometricType> availableBiometrics;

try {
    availableBiometrics = await auth.getAvailableBiometrics();
} catch (e) {
    print("error enumerate biometrics $e");
}
Print list of authenticator present in target device
print("following biometrics are available");

if (availableBiometrics.isNotEmpty) {
    availableBiometrics.forEach((ab) {
    print("\ttech: $ab");
});

} else {
print("no biometrics are available");
}
Now write code to authenticate through biometric
bool authenticated = false;

try {
    authenticated = await auth.authenticateWithBiometrics(
    localizedReason: 'Touch your finger on the sensor to login',
    useErrorDialogs: true,
    stickyAuth: false
    // androidAuthStrings:AndroidAuthMessages(signInTitle: "Login to HomePage")
);

} catch (e) {
    print("error using biometric auth: $e");
}

setState(() {
    isAuth = authenticated ? true : false;
});

print("authenticated: $authenticated");
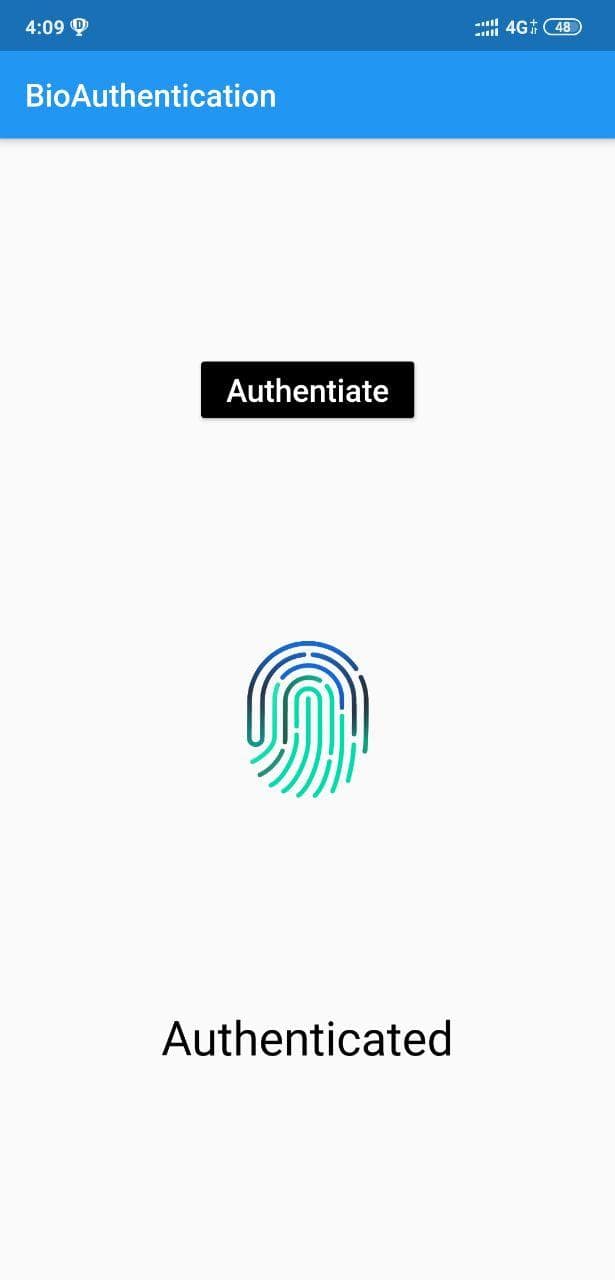
In this way, it is easy to authenticate the user using their biometric information. In above example's preview I have used Rive animation for fingerprint animation. If you are not familiar with Rive, checkout this blog for more - Rive animations for Flutter.