Build Train and Deploy your Rasa Bot
A lot of conversational assistants have user goals that involve collecting a bunch of information from the user before being able to do something for them. This is called slot filling.
For example, in the banking industry, you may have a user goal of transferring money, where you need to collect information about which account to transfer from, whom to transfer to and the amount to transfer. This type of behavior can and should be handled in a rule-based way, as it is clear how this information should be collected.
For this type of use case, we can use Forms and our FormPolicy. The FormPolicy works by predicting the form as the next action until all information is gathered from the user.
As an example, we will build out the SalesForm. The user wants to contact our sales team, and for this, we need to gather the following pieces of information:
- Their name
- Their job
- Their use case
- Their contact number
Note: If you are a beginner first go through Basics of Rasa and then get started with coding.
Start coding
-
Install and start a New Rasa Project. Ref ⇒ click here
-
Start declaring form in
actions.py— The first method we need to define is the name, which like in a regular Action returns the name that will be used in our stories.
from rasa_sdk.forms import FormAction

class SalesForm(FormAction):
    """Collects sales information and adds it to the spreadsheet"""

    def name(self):
return "sales_form"- Next, we have to define the
required_slotsthe method which specifies which pieces of information to ask for, i.e. which slots to fill.
@staticmethod
def required_slots(tracker):
    return [
        "job_function",
        "use_case",
        "person_name",
        "contact-info",
]- You’ll need to specify how the bot should ask for this information. This is done by specifying
utter_ask_{slotname}responses in yourdomain.ymlfile.
utter_ask_contact_info:
  - text: What's your contact number?
utter_ask_job_function:
  - text: "What's your job? 🕴"
utter_ask_person_name:
  - text: What's your name?
utter_ask_use_case:
- text: What's your use case?- Define all these slots in our
domain.ymlfile.
slots:
  job_function:
    type: unfeaturized
  person_name:
    type: unfeaturized
  contact_info:
    type: unfeaturized
  use_case:
type: unfeaturized- Define submit function in actions.py.
def submit(
        self,
        dispatcher: CollectingDispatcher,
        tracker: Tracker,
        domain: Dict[Text, Any],
    ) -> List[Dict]:

    dispatcher.utter_message("Thanks for getting in touch, we’ll contact you soon")
return []- Create a new section in domail.yml file
forms:
- sales_form- Create an intent to activate the form. Add the following code in nlu.md file.
## intent:contact_sales
- I wanna talk to your sales people.
- I want to talk to your sales people
- I want to speak with sales
- Sales
- Please schedule a sales call
- Please connect me to someone from sales
- I want to get in touch with your sales guys
- I would like to talk to someone from your sales team
- sales please- Also, create an intent to get the form slot details.
## intent:inform
- I work for [Rasa](company)
- The name of the company is [ACME](company)
- company: [Rasa Technologies](company)
- it's a small company from the US, the name is [Hooli](company)
- it's a tech company, [Rasa](company)
- [ACME](company)
- [Rasa Technologies](company)
- [John Doe](person_name)
- [Jane Doe](person_name)
- [Max Mustermann](person_name)
- [Max Meier](person_name)
- We plan to build a [sales bot](use_case) to increase our sales by 500%.
- we plan to build a [sales bot](use_case) to increase our revenue by 100%.
- a [insurance tool](use_case) that consults potential customers on the best life insurance to choose.
- we're building a [conversational assistant](use_case) for our employees to book meeting rooms.
- [9876543210] (contact-info)
- [1212332121] (contact-info)
- [24256678] (contact-info)
- [67681211] (contact-info)
- [9098012345] (contact-info)- Add the intent and entities in domain.yml.
intents:
  - greet
  - bye
  - thank
  - contact_sales
  - inform

entities:
  - job_function
  - person_name
  - contact_info
- use_case- Add the story to your
stories.mdfile.
## sales form
* contact_sales
    - sales_form                   <!--Run the sales_form action-->
    - form{"name": "sales_form"}   <!--Activate the form-->
- form{"name": null} <!--Deactivate the form-->- Add policies in the config.yml file.
policies:
  - name: MemoizationPolicy
  - name: KerasPolicy
  - name: MappingPolicy
- name: FormPolicy- Uncomment the following line in your
endpoints.ymlto make Rasa aware of the action server that will run our form.
action_endpoint:
 url: "http://localhost:5055/webhook"
Test your chatbot
- Run action server in terminal using following CLI command.
rasa run actionsIf the action is running in the server, change the URL in the endpoints.yml file.
- Then you can retrain and talk to your bot.
rasa train
rasa shell
Getting the form data
Many ways to retrieve data of the forms. Mostly we need all the data at the moment of submitting. So I used this method at the submit method.
Edit action.py file:
def submit(
        self,
        dispatcher: CollectingDispatcher,
        tracker: Tracker,
        domain: Dict[Text, Any],
    ) -> List[Dict]:
        dispatcher.utter_message("Thanks for getting in touch, we’ll contact you soon")
        details=[
            "person_name",
            "contact_info",
            "company",
            "use_case",
            ]
        for i in details:
            print(i,":",tracker.get_slot(i))
        return []
Deploy your chatbot
The recommended way to deploy an assistant is using either the One-Line Deployment or Kubernetes/Openshift options we support. Both deploy Rasa X and your assistant. They are the easiest ways to deploy your assistant, allow you to use Rasa X to view conversations and turn them into training data, and are production-ready.
For the above-discussed use case, we have to deploy two different servers: one is for the NLU core another is for the actions.
In this article, let us discuss how to deploy RASA using docker.
- Install docker and verify its version.
- Setting up your project.
Init project inside docker image using:
docker run -v $(pwd):/app rasa/rasa:1.10.7-full init --no-prompt-v $(pwd):/appmounts your current working directory to the working directory in the Docker container. This means that the files you create on your computer will be visible inside the container, and files created in the container will get synced back to your computer.rasa/rasais the name of the docker image to run. ‘1.10.7-full’ is the name of the tag, which specifies the version and dependencies.- the Docker image has the
rasacommand as its entry point, which means you don’t have to typerasa init, justinitis enough.
- Talk with assistant
docker run -it -v $(pwd):/app rasa/rasa:1.10.7-full shell- Train your model
If you edit the NLU or Core training data or edit the config.yml file, you’ll need to retrain your Rasa model. You can do so by running:
docker run -v $(pwd):/app rasa/rasa:1.10.7-full train --domain domain.yml --data data --out models-v $(pwd):/app: Mounts your project directory into the Docker container so that Rasa can train a model on your training data- rasa/rasa:1.10.7-full: Use the Rasa image with the tag ‘1.10.7-full’
train: Execute therasa traincommand within the container.
Deploy your chatbot in Heroku with docker
- Click below link to deploy the initial rasa docker in Heroku.
DEPLOY- https://heroku.com/deploy?template=https://github.com/just-ai/rasa-heroku-template
- Inside the project folder, create a file called Dockerfile. Inside that folder copy the following code
FROM ubuntu:18.04
ENTRYPOINT []
RUN apt-get update && apt-get install -y python3 python3-pip && python3 -m pip install --no-cache --upgrade pip
RUN pip3 install --no-cache rasa
ADD . /app/
RUN chmod +x /app/server.sh
CMD /app/server.sh- Inside the same folder, create a server.sh, file and copy the following code.
cd app/ && rasa run --model /app/models --enable-api --cors "*" --debug -p $PORTIf you want to deploy action instead of that copy the following code
cd /app && rasa run actions -p $PORT- Open terminal and change directory to the project folder.
$ heroku login
$ heroku container:login
$ heroku container:push web
$ heroku container:release web
Your project got deployed successfully on the Heroku server🎉 .
Note: First deploy the action server and then replace the URL with action_endpoint in the endpoins.yml file. And then deploy the NLU server.
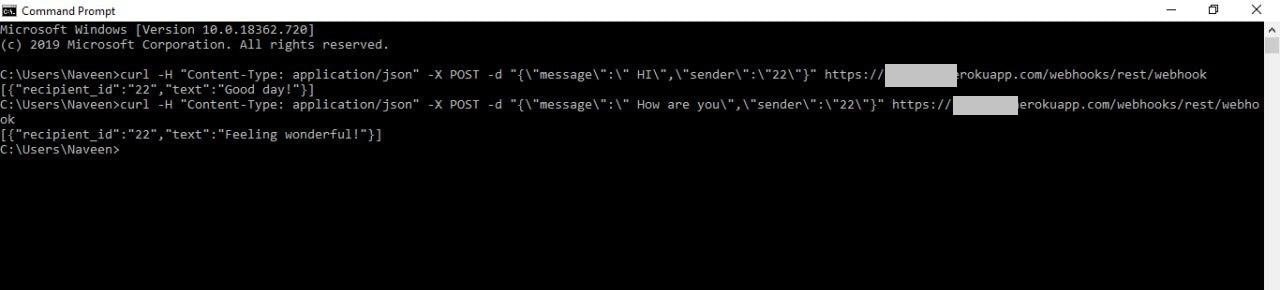
You can test your bot by running the APIs using CURL or Postman
In this article, we have discussed how to make a form and get the slot data from the user and how to use that data.